1-3-1 Zone Plays
Summary: Not too many teams specialize in a 1-3-1 zone, but it is a problematic zone to face if you are not familiar with it. If you know a team plays this zone and you are ready for it, you can score easily using simple concepts of overloading and ball movement. The following plays are simple quick hitters that you can use against a team that runs a 1-3-1 zone.
Why should you use these plays?
- Preparation: You are facing a team that plays a 1-3-1 zone almost exclusively.
- Simplicity: You need a couple quick hitters to install for a game or two.
- Effectiveness: You can design plays to put the ball in the hands of your best shooters.
- Game changers: You can force a team away from their primary defense.
What are some challenges when implementing these plays?
- Time: You may only need these against 1 or 2 teams on your schedule.
- Skill: Hard to prepare against it because many teams don’t feature this defense.
- If your team lacks the ability to pass over or around a defense, you are in trouble.
Key Coaching Points
As with any defense, the key to knowing how to beat it, is to know where it has weaknesses. Also, no defense is rock solid in all places, so they are willing to concede certain shots. If you can make the shots they are willing to concede, you are well on your way to success.
Player Roles
Ball handler: You have to have an unselfish primary ballhandler here as to beat a zone you cannot be dribble heavy. If your point guard likes to isolate and beat defenses on their own, you may want to play them off the ball against this type of zone. The ability to fake a pass and then make a pass is much more important than a killer crossover.
Primary Shooter: To beat a zone absolutely have to have a player or two that can knock down a jump shot. All three of these plays should free up a player to with an open look as the primary option. Beyond being able to knock down a three, they should be able to read a screen, and have the ability to get their feet ready to shoot every time they touch the ball.
Secondary Shooter: Your second best shooter should still get plenty of open looks. It is quite alright, if there isn’t much of a difference, to stagger this position and the primary shooting position. Especially if one player is hot and the other is not.
Bigs/Screeners: Your bigs are primarily used as screeners in these plays, however, if you have a big man who is an effective, back to the basket, low post player, then you can tweek these plays to have them be your primary offensive weapon.
Coaches Quote:
Tom Izzo’s Michigan State teams have certainly chewed up plenty of 1-3-1 zones in his time there, “No matter what we run, whether against a zone or a man to man we need to have an inside scoring option and an outside scoring option.” It is that simple, if you can make a defense decide which one they are going to concede, usually the outside shot, then you have them beaten before you even start.
Basic Flow of the Offense
Play #1: SWING
Your primary shooter should start the play from the top of the key. Don’t worry that we are showing an odd front against an odd front zone, that changes after the first pass. As 2 passes to 1, he cuts to the rim. At the same time 5 is stepping up and screening the middle of the zone. If we can get a layup here, obviously we take it, but if a team plays solid defense they may take that away.

If your big man can stretch the floor, they can take a three here as they pop out from the free throw line. If not, they should simply reverse the ball to 3. Coaching point: Make sure your weakside guard, 3 in this diagram, makes a hard L cut. Looping these cuts is a bad habit and the play will get busted by this laziness.

The first time you run this play you should get a wide open three for your best shooter in the corner. If you don’t get that, they should have an advantage to drive the lane to try and score.
After you have run this once or twice, defenses are going to jump to the shooter and the post player, 4 in this diagram, should be open to slip, catch and score.

PLAY #2: OVERLOAD
This next play uses overload principles against a 1-3-1 and it forces the player running the lowest level of the zone to make some tough decisions. Your primary shooter should start the play with the ball in hand. Otherwise, all the perimeter positions are interchangeable. Play starts with a simple wing pass to 2, and 5 jumps out to set a ball screen on the wing defender.

The pick and roll look is false action. We are really rolling our big man to the rim to drag defenders with him and to overload the side we just came from. 2 dribbles towards top of the key. 5 rolls to the rim. 4 sprints corner and 1 sprints to wing. You should end up with 3 players on the right side with only two defenders in position to help.
1 might be open but your better options are to 4 in the corner or a post up for 5. Obviously put a player in the 4 spot here who can shoot a corner three. Their size doesn’t really matter.

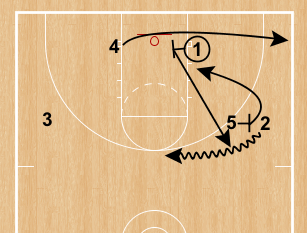
PLAY #3: CORNER
In this play you want your primary shooter running the baseline. After the pass from 1 to a wing, he cuts through but this is false action. He curls and is going to set a screen on the lowest level of the zone. 3 takes a few steps to the corner and

5 pops out and screens the top of the zone. 4 dribbles across to hit 2 in the corner. Numbers can be adjusted here to put your better ball handlers in the pick and roll.

To learn more about attacking a zone defense, take a look at this offer from coachtube.com. Read and React: Zone Offense Simplified.
Closing thoughts from Coach Ben Murphy: (@benjaminmurph55 on twitter)
Getting easy shots against a team’s primary defense really can be a difference maker. Teams that play 1-3-1 usually love to play it. If you can force them out of it, you have probably won the mental game and that goes a long way to winning the physical game.